WOVEN BASKET ART WALL – LEARN TIPS ON HOW TO STYLE ONE
Happy Humpday loves. I’m delighted to share some tips today on styling a woven basket art wall but first I can’t begin to tell you how excited I am that we will have sun for the next several days in Connecticut. You must be saying to yourself…”why is she so excited about sun”? Well, we have had one heck of a time convincing Mother Nature that Summer is officially right around the corner. It seems we have had more days without the sun than days with. The winter blues seem to be holding on I tell ya. I just want to crawl in bed and turn the heat on LOL.
With having to spend so much time indoors these past several week, it’s allowed me some time to look around my home and figure out the burning question “what’s next”? Even though I’ve completed some project like this one in the sun room, I’m slowly working on little projects I’ve thought about doing but just haven’t gotten around to them. My favorite local flee market has finally opened so I’ve already scored some new treasure which I’ve shared on my instagram page.
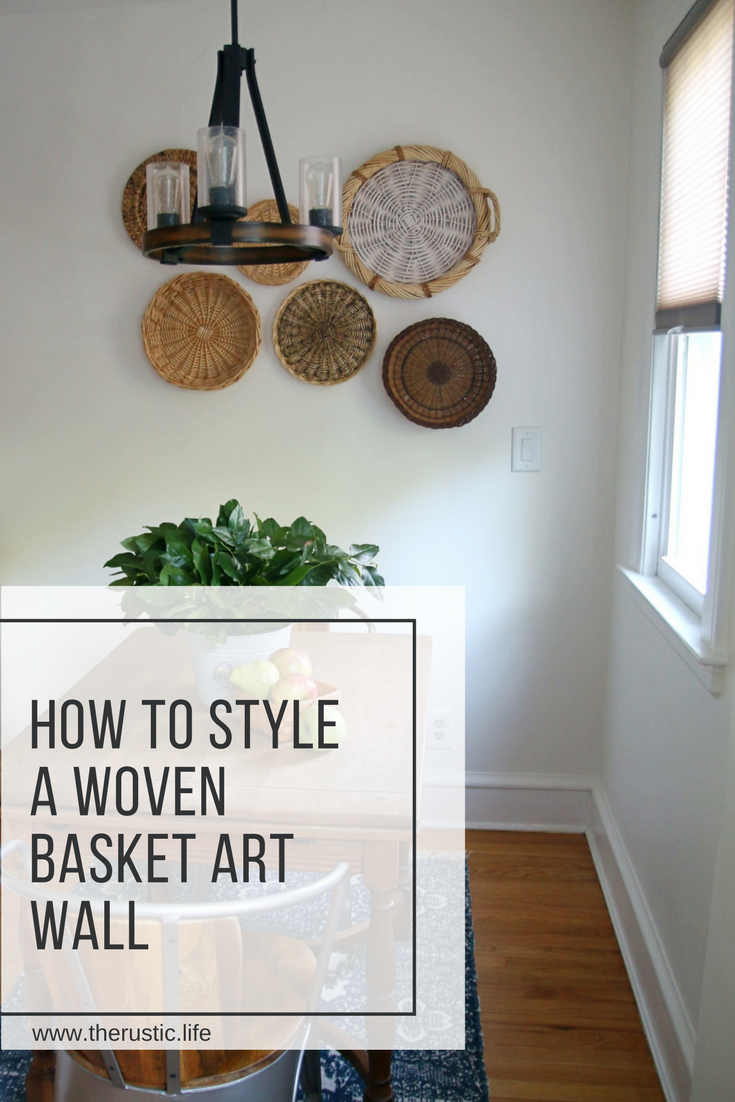
Today, however, I’m showing you my new women basket wall art I installed in the kitchen for under $10!. A little over a month ago, I shared a recent trip to the Goodwill in which I found some woven baskets. I had NO idea what I was going to do with them but I picked them up just the same. So last Sunday as I was at the flea market I saw some more woven baskets and an aha moment happened.
My kitchen woven basket art wall idea was born. Alas here it is. I even put it together without my husband around. He thinks he needs to supervise my “nail holes”. He kills me with that. Shhhh there are a few under the baskets, we just won’t tell him.

Here are some tips I wanted to share with you for installing a woven basket art wall.
- You don’t have to buy new. Save yourself some money. Hit those thrift stores and flea markets. I spent no more than $10 for all these baskets and the most expensive one was the large one which I bought for $3.
- Design your baskets. If you think your woven basket is plain Jane. Fix it. On the big basket, I painted the inside with white chalk paint and the basket to the lower left of that I stained with a dark wood stain. You could do anything from painting on stripes to polka dots. The sky is the limit.
- Start with a focal basket. I don’t mean that the basket has to be in the center to be a focal point, I just mean to hang that first main basket and design around that. In my case, I hung the biggest one first on the edge of the center of the space and worked my way out from there.
- Last but not least, do a mock styling on the floor. Lay out the baskets so you get an idea of the direction in which you want the baskets to flow and take a photo. The photo will help as a reference point as you begin to hang them.
- Mix up your textures and colors. Don’t pick the same sizes. It adds for more visual interest and tones. Also, you don’t have to just include baskets. As you can see there is charger (all the way to the left at the top) it’s not basket per se but it goes so well!
- To hang your baskets…super easy! Just use little nails, hammer them in and hang. I used nails. That’s it. No tape or other nonsense. Super easy and you can cover the little holes if you make a bunch of them LOL.
I really love the way this came out. The area behind the table needed something and I’m glad I waited to figure out something that would make a statement and at the same time add some texture.
I hope you give this a try! As you can see styling a woven basket art wall is really easy and won’t break the bank.


I love how you styled these! Great tips too. I just purchased a few baskets this weekend to do something similar in a bedroom.
Thanks so much Niki! I really appreciate that and hope to see your project 🙂
Your idea of woven baskets on wall is so great.Never thought I could use my baskets this way. It gives such a great look to the kitchen. An eye catching work it is. Thank you so much for this tip.Keep up the great work.
Regards Akshay
Thank you Akshay, isn’t it a affordable and easy way to add texture and color to a wall. So glad you like the idea!
XO Sandra