
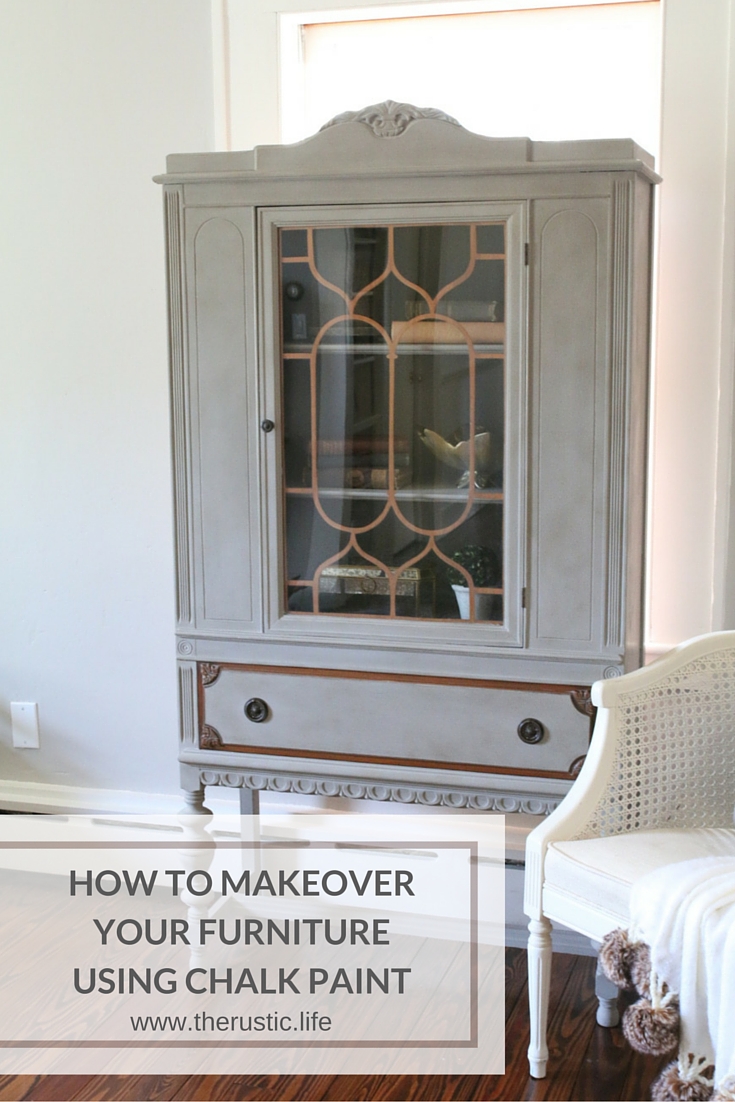
Do you have a pice of furniture or a piece of home accent that needs a little TLC or a makeover? Well today I’m sharing with you the makeover I did on an Armoire using Amy Howard One Step Paint. In the fall I bought this armoire because of the beautiful lines and elegant look. With the holidays past us, this was the perfect time I had to dedicate to making this over. I have painted furniture using chalk and milk paint before so I was really excited when I gained the knowledge of how to use Amy Howard One Step Paint on a recent trip I went on to Memphis. I truly am looking forward to arming you with more ideas so you can enjoy the bragging rights when some says “I love that, where did you get it” and you respond “I did that”.
Amy Howard One Step Paint comes in over 50 colors. It has a soft chalky texture to it. It’s made in the USA, contains no methanol, no VOCs and it’s certifiable green. You can use this paint on many surfaces including formica, plastic, metal and lacquered wood.

Here is the armoire before. It’s a beauty isn’t it. I chose the color Selznick Grey to paint the piece in.

BEFORE YOU START PAINTING: Use Simple Green to clean the surface of what you will be painting to clear any dust, dirt etc. (you can find this at Home Depot) no need to sand before painting. Please be sure to remove all the simple green with a clean wet cloth before proceeding. IMPORTANT: Thoroughly shake the can for 1-2 minutes and then stir with a stick. This shaking will bring up the pigment from the bottom of the can.

Use a brush that is going to give you a smooth finish. Paint your piece all over. Don’t let the paint become to thick in areas and let dry 30-45 minutes. Apply a second coat and allow to dry for the same amount of time. If you want your piece to have that chalky look without applying wax after, leave as is. There is NO sealing required for One Step Paint. I wanted my piece to have an authentic antique look so I used both the light and dark wax as well as the dust of ages.
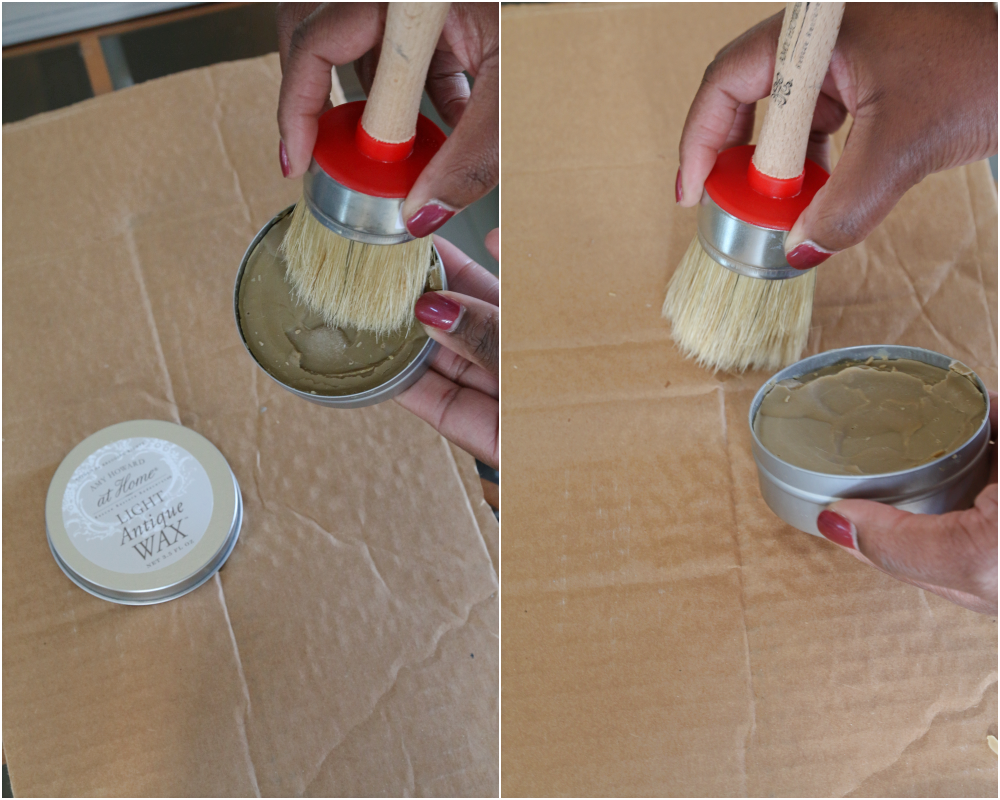
When using the wax, rub a clean china bristle brush into the wax onto the tips and…VERY IMPORTANT… off load excess wax onto a piece of cardboard. You don’t want your bristles to be overwhelmed with wax.

Swipe bristles with the light wax in different directions with no particular pattern across your piece. Cover every inch and allow to dry 45-60 minutes.
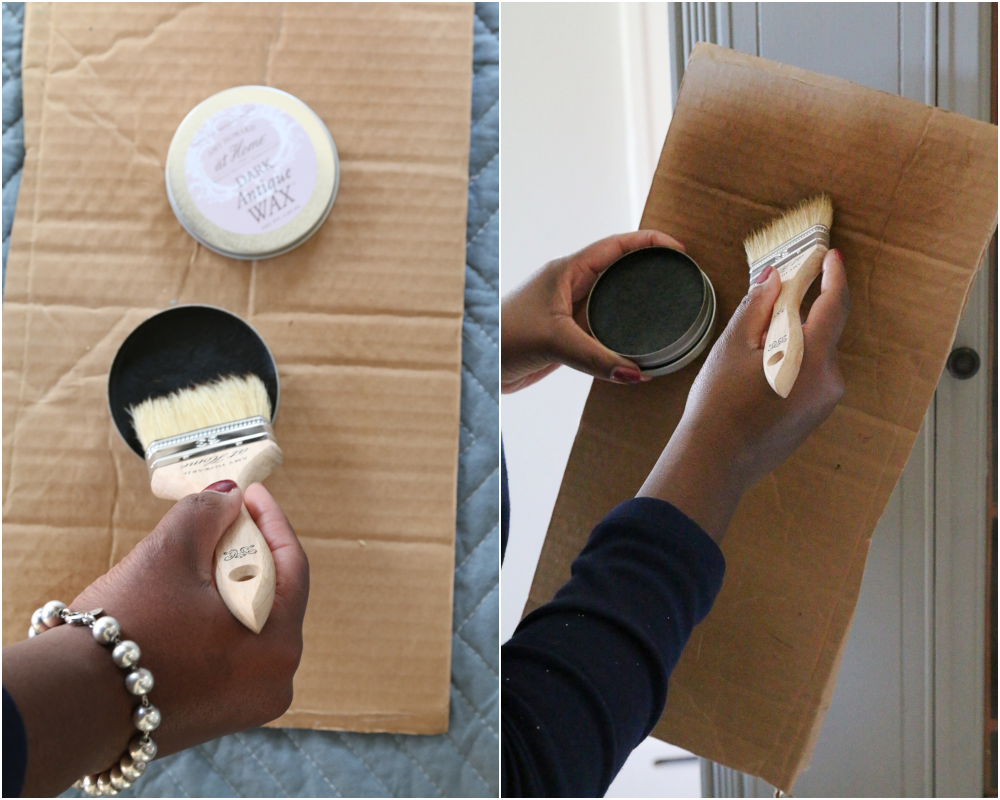
With a clean china bristle brush (don’t use the same one that you used with the light wax) use the dark wax only where the pieces would get naturally dirty over time, like the edges of piece of trim or the crevices of a cabinet door.


You do not want to cover every inch of your piece with the dark wax. Allow your dark wax to dry enough but still remain tacky. This will allow the Dust of Ages to stick and settle to the piece.

Use the Dust of Ages to cover your piece, especially in the ridges and crevices. Use a dry china bristle brush to pounce/push your dust into the corners, crevices ad ridges. Really use that brush to get the dust in there. Come on, don’t be shy. When finish, dust off the excess. Feel free to put the excess that you dust off back into your container. It can be reused and saved for later.

Lastly, use a t-shirt rag to buff your piece to get a patina shine. The buffing will allow your piece to have that authentic aged look.
Honeslty, I did this project over a 2 day period. It’s so easy and so fun. Can easily be a weekend project. It could be done in one day, but we all have a life to tend to. I can’t wait to share more projects with you all.
Amy Howard At Home One Step Paint can be found at Ace Hardware stores across the country. To learn more tips visit Amy’s You Tube Channel.
I hope you try out a piece and share with myself and Amy on Instagram.
Hi Sandra. I follow you on Instagram, but this is my first visit to your blog. This beautiful painted peace made me want to check you out!! I am so glad I did! I just love your home and style! Have a great day 🙂
Well I hope you come back Christina!! It was a great project to work on. You can subscribe for free so you don’t miss any posts. Happy Wednesday!
Great article and lovely projeCt. LOve the step-by-step explanaton of the proCess. Amy Howard is a wonderful product – cannot wait to tackle a large piece of furniture myself. Anxious to read the reSt of your blog!
Excuse the caps! Didn’t show up that way on phone.
Thanks so much Brenda for the feedback. I know you are going to do a great job and I hope this was able to help you!
Ok I’m ready to start! Got my One Step Paint color, got my Antique Light Wax, got my Antique Dark Wax, question, I didn’t purchase the Dust of Ages my piece doesn’t have much in the way of crevices will that keep it from having an antiqued look, did you use the Dust because of your crevices or did that help with the overall look?
Hi Eva, i’m so happy you are going to start a project. Yes, the dust of ages was because of the nooks that I had, since you don’t have much in the way of crevices, skipping the dust of ages is OK.
XO Sandra
Hi Sandra, this turned out so amazing! I’m getting ready to paint my first piece with Amy’s paint and can’t wait to see the result!
Want to get together for lunch or coffee soon? I’d love that. We can meet in the middle 🙂
Thank you Dagmar! I didn’t even see this comment until just now! YES would LOVE to meet up! We can email/text to make arrangements!
This is beautiful!
You and I could become fast friends if I were back in CT. where I truly belong.
Seems we have similar tastes and style and I would love to meet you!
Aw Marilyn, wish you lived closer! Let me know if you are ever in the area or in the trip-state area!
My paint is so thick like clay. I stirred with a paint stirrer and now it looks like soupy mashed potatoes with tiny lumps all in it. What am I to do? Use an electric mixer? Discouraged!
Hi Beth, when and where did you get your paint? Did you shake it REALLY well and leave it turned upside down for 10-15 mins before using. Also you have to stir it really well. Let me know about all this.